Saturday, 28 September 2013

Apricot and Almond Tart


The combination of apricots and almonds with a touch of honey creates a delicate burst of flavors to quench the most discerning of sweet palates.
Macerating fresh apricots with sugar or slow poaching in a sugar syrup will enhance their subtle flavor without overcooking them.
This apricot and almond tart combines all of the above to create a mouth watering treat, whether its for a coffee time snack or as a dessert for a dinner party.

Short Pastry
75g unsalted butter at room temperature
2-3 egg yolks
25g Icing sugar
150g Plain Flour
1-2tbsp water, optional
Rub together the flour, sugar and butter until the mix resembles fine breadcrumbs.
Add the egg yolks and mix with enough water to make a smooth soft pastry.
Wrap in clingfilm and chill for about 30 minutes to firm the dough.
Roll dough out thinly to line the base and sides of your tart tin ( this mix is enough for a deep 8inch tart tin) If you find that your pastry tears easily you can patch it with your fingertips. Prick the base slightly with a fork, line with parchment paper and weigh down with baking beans and bake blind at 170c/150c fan/ gas 3 for 25 minutes. Remove the parchment and beans, bake for a further 10 minutes until crisp. Remove from oven and leave to cool. At this stage the base will store chilled for 3days.

Fruit filling
8-10 Fresh apricots, halved and de-stoned
Handful of sugar, adjust depending on the sweetness of the apricots
2tbsp honey (for a more enhanced flavor you could use brandy or Grand Marnier)
Place apricots in a bowl and toss with the sugar. Drizzle with the honey or alcohol and leave for at least an hour to infuse the flavors and soften the apricots. I find its best to do this the night before to get maximum macerating time.
Drain the apricots and leave to dry for a while, making sure to reserve the liquid for use later.

 Frangipane filling
115g Butter, softened
115g Honey
100g Ground almonds
2 eggs
1/4 cup Double Cream
Whisk together the butter, honey and ground almonds until smooth.
Add the cream but stir it in rather than whisking so as not to emulsify, this will make it rise during baking ( if you do want a slight rise during baking then whisk slowly for a few seconds)
OR
You can make the frangipane filling from my earlier post The Bakewell Tart Experience, which is a more cake like frangipane.

Either frangipane filling works just as well however I find that the creamy filling creates a better tart for cold/warm dinner dessert while the cake frangipane makes a better hot dessert especially if served with custard or a coffee time snack

To assemble the tart, arrange the apricot halves on the base of the tart crust and pour the creamy mixture over the top. Bake at 180c/170c fan for about 25 - 30 minutes or until lightly golden brown. Longer baking time is required for the cake frangipane, check by using the skewer test during cooking
Cake Frangipane Tart

You can also make individual tarts rather than one whole tart, this recipe will give 8-10 good sized tarts. For parties etc you can make them smaller and get about 20-24 mini tarts. For these you will need to cut the fruit smaller, I tend to quarter the apricots and then slice each quarter into half again or slice thinly and arrange on top of the frangipane. Making sure to push the slices down into the frangipane slightly.
Individual Tarts

You can use this recipe with other fruits such as peaches, nectarines, plums and any other stone fruit that is in season.
This is a great recipe for a dinner dessert as it can be prepared well in advance before being assembled and baked on the day/evening.
Serve warm simply with the reserved macerating liquid, ice cream, creme fraiche or custard.

Enjoy!!!

Friday, 20 September 2013

Fig Newtons or Fig Rolls?

 Fig Newtons
Called Fig Newtons in the U.S.A and Fig Rolls in the U.K, these are a cross between a cake and a cookie, made with an almost soft cake like pastry and filled with a moist fig filling.


Fig rolls are made from a short pastry which is filled with a fig paste, originating from Egypt where they are still a very popular treat. While in Europe and the rest of the world the pastries are known as Fig Rolls and are produced by the Britannia companies in India.
However the American Fig Newton was introduced by Charles Roser, during the development of industrial production, to the Kennedy Biscuit Company. He called them Newtons after the local town of Newton, Massachusetts. The Kennedy Biscuit Company later merged with the New York Biscuit Company to form Nabisco, who trade marked the product as Fig Newtons*

Fig Newtons are made from a pastry which is more cake like while being soft and chewy in texture. While the Fig Rolls are made from a short pastry dough and are more crumbly.

Here are recipes for both for you to try and see which you prefer
Fig Newtons
200g S/R Flour
100g Butter
75g sugar
25g honey
1/4 tsp Baking powder
1/4tsp salt
2tsp Vanilla Extract
large pinch of ground cinnamon
1tsp Orange zest
3 Egg yolks
2-3 tbsp of orange juice

Filling
300g dried figs
50g apple sauce
3-4tbsp honey
1/4 tsp cinnamon

For Fresh Fig Filling
2 - 3lbs Fresh Figs (depending on how much filling you use), Quartered
4tbsp Honey
1/4tsp cinnamon
1/4cup water
Boil all the ingredients on a low/medium heat until you get a semi dry mix, blend to get a smooth paste and then bring back to the heat to remove any excess liquid making sure not to over cook the figs

Sift the flour and salt, set aside
Cream the butter and sugar along with the honey, baking soda, vanilla, cinnamon and orange zest, until pale and fluffy
While continuously whisking gradually add in the egg yolks, mixing well after each addition.
Add all the flour and the orange juice (start with 2tbsp) and mix until well combine, the dough will be soft and wet (if not then add in the extra tbsp of orange juice).
Cover your worktop with clingfilm/plastic wrap (enough to wrap the pastry mix)
Scrape your pastry into the middle of the clingfilm, wrap once and flatten then wrap with remaining clingfilm and refrigerate for a minimum of 5 hours or overnight
The pastry will still be soft but more manageable.
For the filling
Place all the ingredients into a blender/processor and pulse until all the mix is smooth (the mixture will be paste like. Put mix into a piping bag with a plain basket weave tip or corner snip the piping bag
To roll the pastry, dust the rolling surface heavily with flour to prevent sticking and dust the dough.
Dust frequently while rolling and turning pastry. Roll pastry to 1/4inch thickness rectangular strip.
Cut into 3.5inch x 7inch strips, this size fits my baking sheet but you can roll the length of your strip to fit your baking sheet (this will making handling easier later on).
Remove any excess flour from pastry. Pipe filling into the middle of each strip, my filling is about 1inch in width and 1/4inch thick.
I find this ratio works well but you can make it thinner or thicker.
Roll the one long end of pastry over the filling and then roll the folded end over the flap of pastry. The dough will be doubled where the two strips overlap at the bottom, this will give you the classic bowed newtons shape.
Dust off any excess flour from the cookies, place onto prepared baking sheets and bake for 12-14 minutes until the cookies have puffed up, lightly browned and are firm to the touch. Continue to cook for a few more minutes if the cookies are moist or not puffed up.
Remove cookie strips from oven and straight away trim each strip into 5 even sized (about 1-1.5inch) long cookies.
While the cookies are still warm, place in a air tight container or zip-loc bag and seal tightly. If you stack them then place a sheet of parchment between each stack. Sealing the cookies while still warm will slightly steam them. This gives them the soft cake like texture while skipping this step will make your cookies more drier.
Store at room temperature for about 2 weeks, though they will not last this long!!!

To make Fig Slices
Split your pastry dough into two equal amounts, Place one piece of the pastry in the freezer for about 2hours or longer so that you can grate it easily.
Use a 8inch x 6icnh x 1inch baking tray, grease and dust heavily with flour.
Take the remaining piece of pastry and flatten into the tray using your hands, making sure it is evenly flattened. The pastry should come up to about 1/3 of the way up, place the tray in the fridge for as long as your frozen pastry is in the freezer.
Spread the fig mixture evenly over the pastry 
Then grate the frozen pastry over the fig mixture and make sure to spread it out evenly.
Bake for about 15 - 20 minutes, should slightly puff up and be lightly golden brown. if still moist in the middle then bake for a bit longer
While still hot cut in half lengthwise and then cut into slices, I get 24 slices in total.
 Fresh Fig Rolls

Fig Rolls
125g Plain flour
125g Plain Wholemeal Flour
150g Lightly Salted Butter, softened
75g Light Brown Caster Sugar
2 Egg yolk
1tsp Vanilla extract

Rub the sifted flours (along with the bran) with the butter until the mixture resembles breadcrumbs
Mix in the sugar, vanilla extract and the egg yolks to make a firm dough (you may require some water or an extra egg yolk to bring the dough together). Wrap in clingfilm/plastic wrap and chill for 30 minutes.
Roll out the dough to 1/4inch thickness rectangular shape and then cut into 3.5inch x7inch strips on well dusted worktop to prevent the pastry sticking.
Pipe the fig paste into the middle of each strip and fold one end over the filling, then fold the folded end over again so that the overlap is at the bottom. Dust of any excess flour and flatten each strip slightly and then prick with a fork or score with a knife
Cut each strip into 1inch biscuits, you should get around 20, place biscuits on a greased baking sheet.
Bake for 12 - 15 minutes in a preheated oven at 190c/gas 5 until lightly browned
For the Filling, use the same quantity as for the Newton recipe.

Fig Rolls
Use other fruits to vary the fillings and add ground nuts to give you a variety in tastes and textures. You can also use this recipe to make fig slices, by dividing the dough into two and roll each piece to fit your baking pan. Place one piece of rolled out dough into the prepared baking pan and prick with a fork before topping with your filling. Cover with the second piece of rolled dough and then bake in a preheated oven for about 15-20minutes or until lightly browned. Check to make sure the bake is cooked all the way through, you may need a longer cooking time. Remove from the oven and allow to cool slightly before cutting into slices.

So which is your favorite and why?


*source material is from Wikipedia

Saturday, 14 September 2013

Todays Bake-Seriuosly Chocolately Pear Brownies


Chocolate and Pear Brownies

These squidgy and moist Brownies are for the chocoholics amongst us but with the addition of pear, they count as one of your five a day!!!

350g Dark Chocolate (70%)
250g Unsalted Butter
3 whole Eggs
250g Caster Sugar(use soft brown sugar for a more nuttier taste)
55g Plain Flour
55g Cocoa Powder
1tsp Baking Powder
2 Ripe Pears, peeled, cored and diced

Pre-heat oven at 180c
Grease and line with parchment a 30cm x 20cm x 4cm baking pan

Melt the butter and chocolate in a bowl over a pan of simmering water (or you can do this in the microwave but make sure not to burn the chocolate).
Meanwhile whisk the sugar and eggs until pale and fluffy then while still whisking pour in the chocolate and butter mix, whisk until well combined
Sift together the flour, cocoa and baking powder then fold into the chocolate mixture.
Add the diced pears to the mix and stir in (Optional - you can add in a handful of chopped nuts of your choice at this stage, they will add another texture)
Pour the mix into your baking pan and level to get an even bake.
Bake for 30-40 minutes, I prefer my brownies to be just soft in the middle so I tend to bake them for about 35minutes. However if you want yours slightly gooey then bake for 30minutes but if like them more cakey then go for the full 40minutes.
Leave to cool before cutting and removing from the pan, you should get 20 squares.
When serving these as a dinner dessert, with ice cream and caramel sauce, I will serve them warm.
If serving as a tea time treat, serve cold with whipped vanilla cream or dredge with icing sugar and cut each square into 2 triangles to serve with coffee.
Instead of using regular pears why not try using Nashi (apple) pears or if your not keen on pears then omit the pears and use mashed bananas.


Good baking and happy eating!!

Friday, 13 September 2013

Autumn Dessert Ideas

Honey Roasted Figs with Vanilla Mascapone and Crushed Toasted Pistachios

Marbled Pumpkin Cheesecake

Red Velvet Whoopee Pies with Crushed Pecans

Mini Apple Fritters Dusted with Cinnamon Sugar

S'mores Cupcakes

Friday, 6 September 2013

Comfort eating on a raining day

With the change of seasons comes the unpredicted weather, one day the sun is shining and the next its pouring down with rain.  But there are those days in between when the drizzle of rain carries on all day and the coldness goes through you.
On these days I want to eat something warm, robust and satisfying for breakfast, lunch and dinner. I don't want to spend all day in the kitchen but neither do I want to have something too light and subtle. Earlier in the week I had made a batch of bread dough, from which I had made Pesto, Rocket and Feta pizza.
With just under a third of the dough leftover( not enough to make a loaf but enough for a couple of rolls). I split the dough into two and then rolled each ball into a oval shaped flat bread, brushed with garlic and herb infused olive oil and baked in the oven for about 8mins in a moderate oven.
I used store cupboard ingredients to make this simple Asian chickpea soup. I made enough for one largish bowl, but you can make larger quantities using this recipe just by upping the ingredients. This is a really good homely comfort eat for me as it always reminds me of my family home.

Channa Masala Soup
1 small onion finely chopped
half a can of cooked chickpeas
half cup of curry sauce (made from previous post) You can use a shop bought curry paste
1tsp garam masala
1 small tomato roughly chopped
2tbsp of low fat yogurt
fresh coriander chopped

Fry the onions in a tsp of oil until soft and transparent, add the curry sauce and warm through. Add the chickpeas with some of the canning liquid and cook by simmer for about 10-15 minutes, you can also season with salt and pepper at this stage if you like. Turn off the heat, but leave on the stove, sprinkle on the garam masala and cover for 2mins.
Serve in a large bowl sprinkled with the coriander,
The tomato and yogurt you can either serve on top or separately on the side.
I had mine with the garlic and herb flat breads but you can serve this with rice or shop bought naan bread.
You can also add a handful of spinach if you have some and if you don't have chickpeas then you can use any canned bean/pulse you have in your cupboard/pantry
This dish should take no more than 25-30mins to make from start to finish, quicker and healthier than any takeaway curry
This recipe is so adaptable to make any type of bean soup using whatever you have to hand.
It is important to add a depth of flavor to canned beans as they tend to be bland on their own. I also use the canning liquid as it contains a lot of nutrients and flavor from the beans.
You can omit the curry sauce with a tomato sauce base, cannellini (white) beans,  adding fresh basil and oregano.
By swapping the cannellini beans with black beans and adding minced chilli, garlic and cumin. Add diced pepper to the onions, you will have a spicy black bean soup. Serve with either sour cream or guacamole for a bit of extra decadence and tacos
 Spicy Black Bean Soup
Add cooked rice during the last 8-10 minutes to make it more like a one bowl chilli ( for a meaty version add diced beef to the onions and saute)
You can use chicken/vegetable stock instead of the sauce, add a couple of minced garlic cloves, oregano , pancetta/crispy bacon and a handful of cooked pasta
Add crumbled Italian sausage or for a Spanish flavor add chorizo
You can also add in the rind of parmigiano-Regina cheese which will give the soup another layer of flavor.
You can also add cooked meats to create a bean stew, I will often use roast meat bones or bits of meat leftover from the previous evening to create a stew in under 30 minutes. Saute the meat/bones with the onions and add any leftover vegetables (chop into a small dice), pour in the beans with the liquid. Add your choice of herbs and stock, leave to simmer for about 20-30 minutes, remove the bones, season and serve.
I hope that these few ideas will encourage you to use more canned beans/pulses to make everyday meals with a minimum of effort and inspire you to create your own combo.
 Chicken, bean and vegetable stew


Joyous dining!!


Wednesday, 4 September 2013

A Marrow day

The other day I was given a marrow by a neighbor. For those of you who don't know what a marrow is, it's basically a large courgette and a member of the squash family . Its subtle in flavor and quite tender, can be slightly watery, so always a good idea to remove the excess water. The skin can be tough and bitter on some varieties.
To prepare the marrow for cooking, top, tail and peel. Scoop out the middle, making sure to remove all the seeds and cut into rings for frying or into chunks/cubes. Sprinkle with salt and leave in a colander for about an hour to remove the excess water.

 
Usually I would stuff it with a savory mince beef mix, top with cheese and then roast, or just simply roast with garlic, olive oil and seasoning, great with grilled fish or chicken. However when having it with roast meat, it's best to put the marrow in the meat roasting tray and let it soak up the meat juices. Do this during the last 25-30 minutes of the cooking time. On my Pickling and Preserving page I mentioned that marrow can be used in Piccalilli. Now as my marrow was quite large, I used about third for the piccalilli, this gave me enough to do two large jars of piccalilli.
With the remaining marrow, I decided to do something a little different then the usual. So after hitting the recipe books for a few hours this is what I came up with.
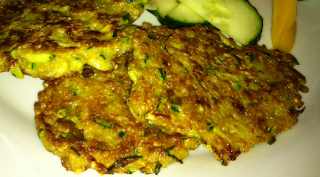
Marrow fritters (this is adapted from a codfish fritter recipe)
This recipe will gives you about 20-24 fritters
400g Grated marrow and 1tsp of coarse salt- combine and leave in a sieve for 30minutes to remove excess water
2 Onions, finely chopped
2 Tomatoes, de-seed and finely chopped
2 cloves Garlic, finely chopped
2 Scallions, finely chopped
1/2 Scotch Bonnet pepper or 2 med size chillies, de-seed and finely chop (adjust to your taste)
Freshly ground black pepper and salt to taste
400g self-raising flour
2tsp baking powder
Oil for frying
Saute the tomatoes, onion, garlic, scallions and scotch bonnet/chillies in about 2tbsp of oil. Once softened, drain and cool.
Drain the marrow and combine with the sauteed vegetable mix, add salt and pepper.
Mix the flour and baking powder, then add to the marrow mix. Add enough water to make a medium batter or use egg and milk to make the batter.
I left the batter for about 30 minutes before frying. I used a tablespoon of batter for one fritter, this made frying in batches easier and gave a more regular size. Keep warm in the oven until you have cooked all the batter.
My first batch was a bit of disaster as the fritters were not cooked in the middle, this was due to my oil being too hot!! Once I got this under control the fritters came out crisp and golden. Next time I think I will saute the grated marrow with the other vegetables. 
I also made a few fritters using a teaspoon, the right bite size for snacks ( great for future game night snack)
For lunch I used the fritters as a filling for my tortilla wraps, 3 fritters per wrap, with lettuce, tomato and sour cream.
For dinner I served the fritters with avocado, tomato, red onion and cucumber salad. My favorite dipping/dressing sauce to serve with any type of spicy fried fritters is yogurt, lemon juice, chopped garlic and mint leaves.

I still had quite a bit of marrow left, which I peeled, de-seeded and then cut in half. With one half I chopped into large 1inch chunks, the other half I sliced into long 1/4inch thick slices, salt and leave to drain for at least an hour or longer if you can.
The diced marrow I used to make ratatouille by substituting the courgette.
I don't have a recipe that I stick to but here is a list of ingredients that I used
Tomatoes - quartered
Aubergines - 1inch chunks
Marrow - 1inch chunks
Onion - quartered and the half each quarter
Peppers(if available) - 1inch chunks
Olive Oil
Fresh Basil Leaves - ripped rather than chopped
Fresh Garlic - crushed
Freshly ground black pepper
Place all the ingredients into a large roasting pan except the basil and make sure to mix well. Roast in a medium hot oven for about 25-35 minutes until the vegetables are tender and slightly browned.
Sprinkle with basil leaves and serve with your choice of meat or fish.
As I froze my ratatouille mix, I did not cook it and left out the basil leaves. You can freeze after cooking as well, just make sure to cool it properly before hand.
This ratatouille mix can be used in pasta sauces, as a vegetable base for cous cous, quinoa, puy lentils and pasta for salads, just omit the basil for other fresh herbs of your choice.
I think that this vegetable base will also work well for a quick vegetable curry.

With the sliced marrow, I made a vegetable lasagne using home-made tomato, pumpkin and spinach sauce with layers of marrow (instead of lasagne sheets) and topped with a bechamel sauce . You can make a meaty version using a classic beef bolognaise sauce. Again I made this for the freezing, therefore I did not top with cheese as I like to do this when ready for cooking.
Both dishes should keep in the refrigerator for about 3 months, once defrosted should take about 30-40 minutes to cook.

If any of you have any other favorite marrow recipes, please feel free to share them with me.

Enjoy!!